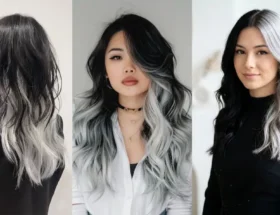
Peekaboo hair color has taken over salons and social media feeds alike. That flash of vibrant color hidden beneath your natural shade? It turns heads every time your hair moves. The best part is you do not need to spend $150 or more at a salon to get it. Learning the 8 essential steps for DIY underneath hair color at home gives you full creative control while saving serious money. Whether you want a subtle pop of pastel or a bold streak of electric blue, this guide walks you through every step safely and clearly.

What You Will Need
Gather every item before you start. Having everything within reach prevents mid-process mistakes and keeps dye from drying out while you scramble for supplies.
- Hair dye or bleach kit (choose a shade 1 to 2 levels lighter than your target for dark hair)
- Mixing bowl (glass or plastic, never metal)
- Tint brush for even application
- Sectioning clips (at least 4 to 6)
- Wide-tooth comb
- Latex or nitrile gloves
- Petroleum jelly or barrier cream
- Old t-shirt or salon cape
- Aluminum foils or plastic wrap
- Timer (your phone works fine)
- Color-safe shampoo and deep conditioner

Person squeezing hair dye from a tube into a black bowl on a digital scale for hair coloring preparation

Pro Tip: Always do a patch test 48 hours before applying any chemical to your hair. Apply a small amount of dye behind your ear and wait. Redness, itching, or swelling means you should not use that product.
The 8 Essential Steps for DIY Underneath Hair Color at Home
Step 1: Prep Your Workspace and Protect Your Skin
Lay down old towels on your counter and floor. Hair dye stains surfaces fast. Put on an old t-shirt you do not mind ruining, or clip a salon cape around your neck.
Apply a thin layer of petroleum jelly along your hairline, the tops of your ears, and the back of your neck. This barrier stops dye from staining your skin. Slip on your gloves before you open any bottles or mix anything.
Brush your hair thoroughly to remove tangles. Smooth, detangled hair makes sectioning much easier and leads to a cleaner color result.

Step 2: Perfectly Section Your Hair
This is the most critical step in the entire process. Poor sectioning is the number one reason underneath color shows through the top layer unintentionally.
Use the handle of your tint brush or a rattail comb to create a horizontal part. Start at your temples and trace a clean line around the back of your head, connecting ear to ear. This creates what stylists call a “halo” part. The top section should make up roughly two-thirds of your total hair volume. Clip this top section securely to the crown of your head.
The remaining bottom third is your canvas. Comb through it once more to ensure it lies flat. If your hair is thick, divide the underneath section into two vertical subsections and work on one side at a time.

Pro Tip: The higher your halo part, the more color will peek through when your hair moves. For a subtle effect, keep the part lower. For maximum visibility, bring it slightly above your temples.
Step 3: Mix Your Hair Color or Bleach
Read the manufacturer’s instructions before mixing. Every brand has a specific developer-to-color ratio. Deviating from that ratio can lead to uneven results or damaged hair.
If your natural hair is dark and you want a bright or pastel shade, you will need to bleach the underneath layer first. Mix bleach powder with 20-volume developer for most hair types. Use 30-volume only if your hair is very dark and resistant. Never go above 30-volume at home. The risk of chemical burns and severe breakage is too high without professional supervision.
For semi-permanent colors on pre-lightened or naturally blonde hair, skip bleach entirely. Apply the color directly to the underneath section.

Step 4: Apply the Color Evenly
Working with one subsection at a time, start at the roots and sweep the tint brush down through the lengths. Roots process the slowest, so they need color first. Saturate each strand completely. Patchy application leads to uneven, splotchy results that look amateur.
Use the brush to feather the color through the ends. The ends of your hair are the most porous and absorb color quickly, so they need less product and less processing time. If you pile dye on the ends, they will turn out darker than the rest.
Keep a damp paper towel nearby. Wipe away any dye that strays onto the clipped top section immediately. The longer it sits, the harder it is to remove.

Step 5: Isolate the Colored Section
Once the underneath layer is fully saturated, place aluminum foils or plastic wrap over the dyed hair. This isolation step does two critical things. It prevents the color from transferring onto your top layer of hair. It also traps body heat, which helps the color process more evenly and vividly.
Fold the foil over the dyed section and tuck the edges against your head. Make sure no colored strands are left exposed. A single loose strand can stain the top layer.
Release your top section from the clip and let it fall naturally over the foils. The top layer acts as an additional physical barrier while you wait.

Step 6: Let the Color Process
Set your timer according to the instructions on your kit. Most permanent colors require 30 to 45 minutes. Bleach processing times range from 15 to 45 minutes depending on your starting shade and desired lift.
Check the color at the halfway mark. Unfold one foil and examine a small section. If bleach has reached a pale yellow stage, it is time to rinse. If the color looks patchy or uneven, reapply to sparse areas and continue processing.
Do not exceed the maximum recommended time on the box. Leaving chemicals on your hair longer than directed will not give you a better result. It will damage the hair cuticle and cause dryness, breakage, or even chemical burns on your scalp.

Step 7: Rinse and Condition Thoroughly
This step requires extra care to avoid bleeding. Lean over a sink or bathtub and rinse the bottom layer first, keeping the top section pinned up and away from the water stream. Use lukewarm or cool water. Hot water opens the cuticle and causes color to bleed into the top layer.
Rinse until the water runs completely clear. This may take longer than you expect, especially with bold shades like red, pink, or blue. Be patient. Any residual dye left in the hair will bleed next time you wash it.
Apply a generous amount of deep conditioner to the colored section. Leave it on for three to five minutes, then rinse with cool water. This seals the cuticle, locks in color, and restores moisture stripped by the chemical process.
Step 8: Dry, Style, and Reveal
Gently blot your hair with a microfiber towel or old t-shirt. Avoid rough towel-drying, which roughs up the cuticle and promotes fading. Let your hair air dry if possible. If you must use heat, apply a heat protectant first and keep the dryer on a low setting.
Once your hair is dry, let the top layer fall naturally over the colored underneath section. Flip your hair, pull it into a half-up style, or run your fingers through it to see the peekaboo effect. That hidden flash of color only appearing when your hair moves is exactly the result you worked for.
Maintenance and Aftercare for Underneath Hair Color
Vibrant underneath color fades faster than your natural shade. The right aftercare routine keeps it looking fresh for weeks longer.
Switch to a sulfate-free, color-safe shampoo immediately. Sulfates strip color molecules from the hair shaft and accelerate fading. Brands like Joico Color Endure and Pureology Hydrate are formulated specifically to protect color-treated hair.
Wash your hair every two to three days instead of daily. Each wash removes a small amount of color, even with gentle products. On non-wash days, use a dry shampoo at the roots to absorb oil without disturbing the dyed section.
Always rinse with cool water. Cold water seals the cuticle and traps color inside the hair shaft. Warm or hot water opens the cuticle and lets color escape with every rinse.
Apply a color-depositing conditioner once a week. These conditioners add a small amount of pigment with each use, refreshing the shade between full dye sessions. Choose one that matches your underneath color for the best results.

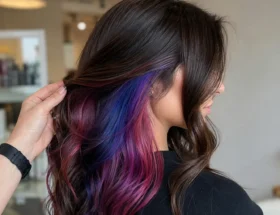
Dark brown hair with pink and purple peekaboo highlights styled in loose waves

Long wavy black hair featuring vibrant purple and pink peekaboo highlights with loose curls

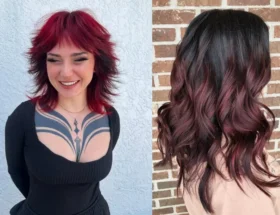
Straight shoulder-length black hair featuring vibrant red peekaboo highlights with sleek blunt cut

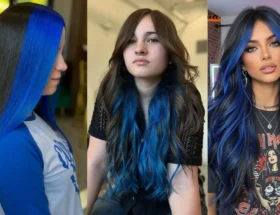
Long blonde hair with vibrant blue and teal ombre peekaboo coloring styled straight
Frequently Asked Questions
Do I need to bleach my hair for underneath color?
It depends on your starting shade and the color you want. Dark hair needs bleaching before any bright, pastel, or vivid shade will show up. If you only want a subtle darker tone like a rich burgundy or deep auburn underneath, you can skip bleach and use a high-lift permanent color directly. Natural blonde hair can accept most semi-permanent colors without any lightening at all.
How do I wash my hair without the colors bleeding?
Wash the dyed underneath section and the top section separately. Lean forward and rinse the bottom layer first with cool water, keeping the top layer clipped up. Then rinse the top layer. This separation prevents pigment from transferring between layers. Always finish with a cool water rinse to seal the cuticle shut.
How long does peekaboo hair dye last?
Semi-permanent peekaboo color typically lasts 4 to 8 washes. Demi-permanent formulas last 12 to 24 washes. Permanent color stays vibrant for 4 to 6 weeks before noticeable fading occurs. Using sulfate-free products, washing less frequently, and rinsing with cool water all extend the life of your color significantly.
Can I swim with underneath hair color?
Chlorine and salt water both accelerate color fading. If you plan to swim, coat your hair with a leave-in conditioner first and wear a swim cap. Rinse your hair with clean water immediately after getting out of the pool or ocean to remove chemicals that strip color.